List of contents:
- What is FV Player Coconut add-on
- Free vs Pro
- Coconut Wizard Setup
- Step one: Coconut setup
- Step two: DigitalOcean Spaces Hosting Setup
- Step three for the free version of FV Player: DigitalOcean Spaces CDN setup
- Step Three for the Pro version of FV Player: BunnyCDN Setup
What is FV Player Coconut add-on
Setting up HLS Encryption with FV Player Coconut is much easier than using Amazon Web Services, and cheaper too. Coconut does a great job at providing an API which you can use to load source videos from different locations and then store the output somewhere else.
You also need a reliable CDN. We have found BunnyCDN works well and only costs a fraction of the Amazon CloudFlare pricing.
It is good to store the files on DigitalOcean Spaces when using BunnyCDN, for flexibility. BunnyCDN is able to pull files from it using the URL signatures to truly keep your source files secure.
Free vs Pro
FV Player Coconut is a free add-on for FV Player. You can download it in our store and use it with both free and Pro version of our player.
With free version of our player you’ll have full access to Coconut encoding without encrypted HLS. If you want to encrypt your videos with FV Player Coconut, you need to purchase the Pro version of FV Player.
FV Player Coconut
Free and easy to use video encoding with high security HLS and signed URLs. What’s not to like?
Coconut Wizard Setup
Setting up video encoding can be a confusing and cumbersome task, therefore we decided to make it much easier by providing the coconut encoding setup in a wizard form.
This wizard will show you comprehensive screenshots of all the necessary steps. Moreover, it will automatically fill in all the required information on your FV Player settings site.
After installing the add-on, a message at the top of FV Player Settings will prompt to finish the setup of Coconut. Alternatively, you can navigate directly to FV Player -> Coconut in your WordPress control panel.

Finish the setup prompt in FV Player settings
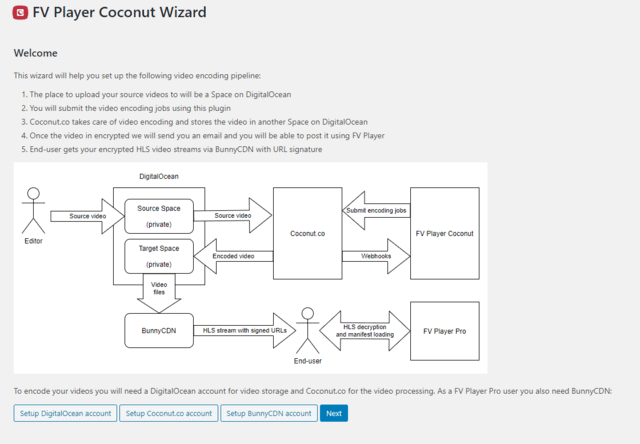
There you will see the welcome screen of the FV Player Coconut Wizard. The wizard will lead you through the steps of setting up your Coconut account, DigitalOcean account, and if you are using FV Player Pro, then BunnyCDN as well.

Welcome screen of FV Player Coconut Wizard for FV Player Pro
Step one: Coconut setup
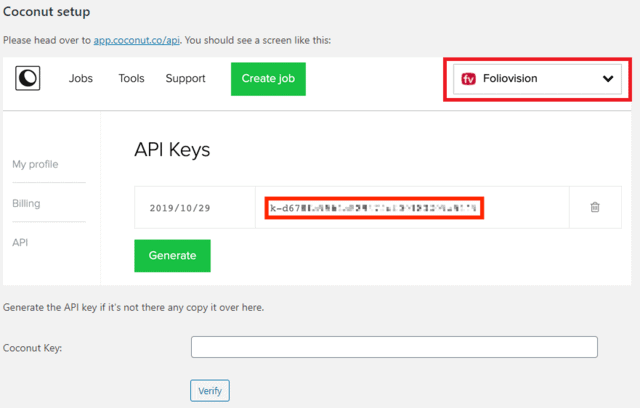
- The wizard will prompt you to insert your Coconut Key. You will find it by opening your account drop-down menu on the Coconut website and picking the API section.
- Insert the Coconut API Key into the Coconut Key field and click verify.
- That’s all you need to configure in Coconut.co. No need to configure any presets, as these are all part of the FV Player Coconut code:
240p @ 500 kbps
480p @ 1000 kbps
720p @ 4500 kbps
1080p @ 6000 kbps
1440p @ 12000 kbps
Step two: DigitalOcean Spaces Setup
Here you can find DigitalOcean’s doc on how to set up a Space in your DigitalOcean account.
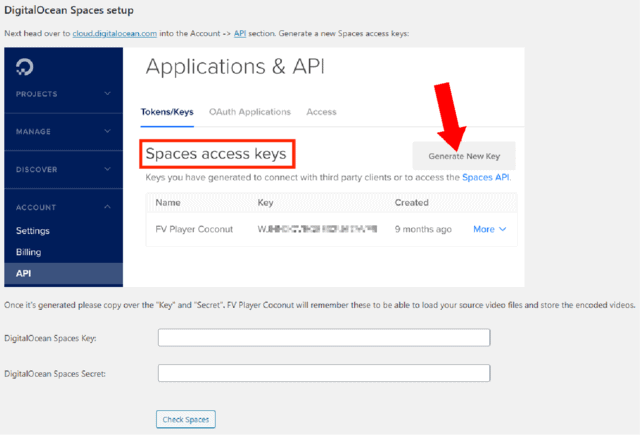
- First, click on the Account -> API link in the main navigation of the Control Panel and generate the Spaces API keys.
- The wizard will ask you to insert both the API key and the secret. These keys will then get automatically stored in Settings -> FV Player Pro -> Hosting -> DigitalOcean Spaces.
- The wizard will also automatically create your DigitalOcean Space for the source video files. This is where you will need to upload any files you would like to get encoded. You can upload it using your web browser or using a desktop application like CyberDuck – using the API keys.
- The wizard will then inform you about your Source Space and Target space. All the important information about your DigitalOcean spaces and account will be automatically stored in Settings -> FV Player Pro -> Hosting -> DigitalOcean Spaces.

DigitaLOcean Spaces setup step in the Wizard

Source Space and Target Space information in the Wizard
Step three for the free version of FV Player: DigitalOcean Spaces CDN setup
If you own FV Player Pro licence, skip this section and set up BunnyCDN instead.
If you have a free licence of FV Player, the wizard will ask you to set up DigitalOcean Spaces CDN instead of BunnyCDN.
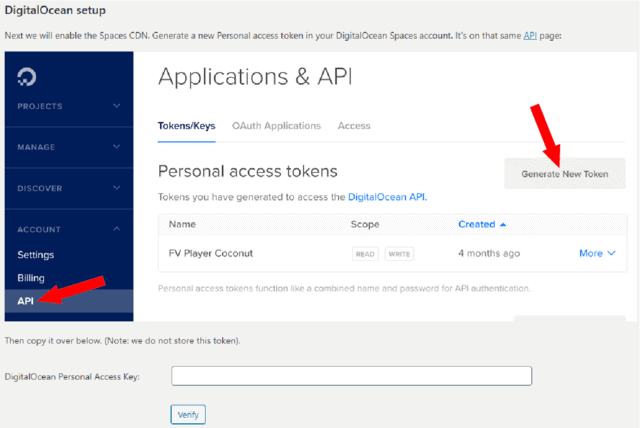
- After completing the previous step of gnerating Spaces Access Keys in Account -> API, click generate new token in the Personal access tokens section.

Creating personal access tokens step in the wizard
After these two setups, your coconut encoding for the Free version of FV Player is finished and ready.
Step Three for the Pro version of FV Player: BunnyCDN Setup
If you have the Pro version of FV Player, the wizard will prompt you to create a BunnyCDN account, which is a great way to make your source files truly secure.
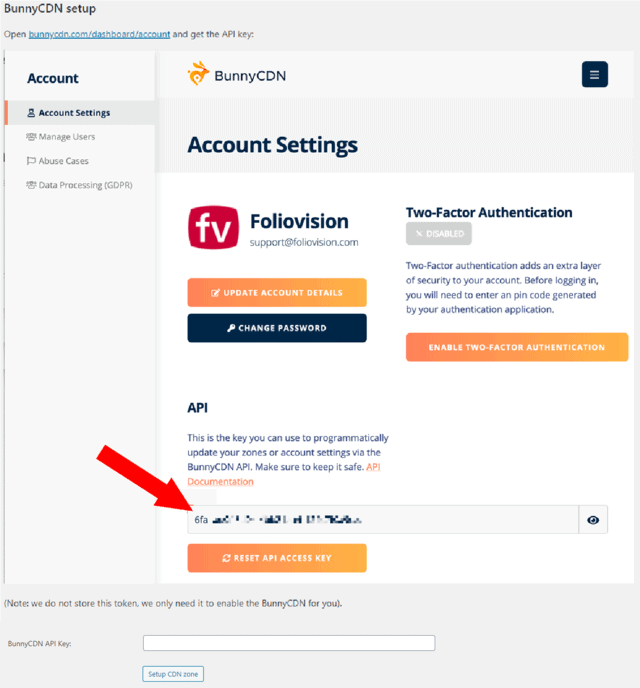
- The wizard will ask you for your BunnyCDN API Key.
- Access your bunnyCDN API by clicking Account in the BunnyCDN dashboard.
- A new pull zone will be automatically created. You can then find your pull zone by clicking Pull Zones in the left Control Panel of your BunnyCDN account and looking for your domain name.

BunnyCDN setup step in the wizard
Now your Coconut encoding and encryption setup for the Pro version of FV Player is finished and ready.
If you want to find out how to use it. Please follow our guide on How to encrypt videos directly in WordPress with Coconut.


