Warning: Undefined variable $seconds in /srv/users/fvision-staging/apps/staging-foliovision/public/site/wp-content/plugins/fv-player-pro/beta/fv-player-pro.class.php on line 2200
Video seems to be everything everyone wants these days. According to CISCO, video will account for 75 per cent of all consumer internet traffic in 2017 and that number will only continue to rise into the year 2020.
Let’s take Facebook as an example. If you publish a written update or a link to your blog post on your Facebook page, you will be unpleasantly surprised by how many people have actually seen your update. But if you turn your post into an image or you go even further and create a video out of it, you will most definitely increase the reach of the message.
It’s simple, Facebook likes video content and it will rank your video posts higher than any other posts. Just don’t confuse it with linking a video from Youtube, because that counts as a normal link post. If you want your video to rank higher in the News Feed, you need to upload it directly to Facebook.
Silence is golden
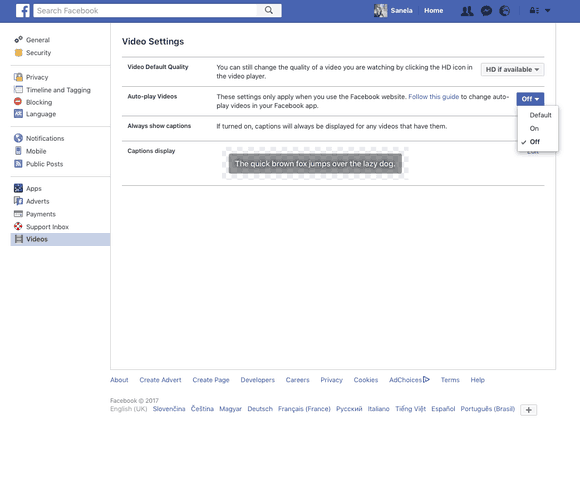
I hate the auto-play feature on Facebook. The fact that Facebook would play the videos in the News Feed automatically for me is very annoying, but I do appreciate that they make it possible to play the videos without the sound.
You can however turn off the auto-play feature if it annoys you. I believe that people have it on just because they don’t know it’s possible to turn it off.
To disable it, go to General settings of your Facebook account:
If you’re a marketer, mute autoplay is something you need to keep in mind when preparing your video posts. If your video has to be seen with sound turned on for a viewer to recognize how great it is, first you need to attract that viewer visually.
If you scroll through your News Feed, you’ll see that publishers have adapted their videos for playing without sound.
Here’s an example:
These subtitles were added directly into the video file, but if you have a video where there’s a lot of talking going on, you might be better off with creating a simple transcript of the video and turning it into a subtitle file. This will help you attract people’s attention even before they turn the sound on, or it will make them turn the sound on and not scroll past your video.
Creating subtitles
The next step is transcribing the video and creating a .srt or a .vtt file. You can either do your transcript manually or google a transcription service to do it for you. I find it’s easier if you just do it manually and edit as you go, but there are ways to do it semi-automatically for free and I’ll mention them later on.
Youtube has a brilliant transcribing service. I remember when I discovered this feature after spending an hour watching the 2 minutes long video I was trying to transcribe. My eyes lit up!
It is a huge time saver. Let me show you how to use it.
1. Upload your video to Youtube, if it’s not there already
Even if you don’t want your video to be on Youtube, don’t worry, you can list it as private and no one but you will be able to see it, and you can simply delete it once you’ve got your subtitle file.
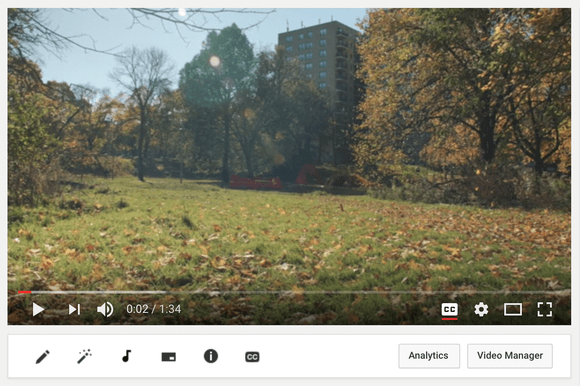
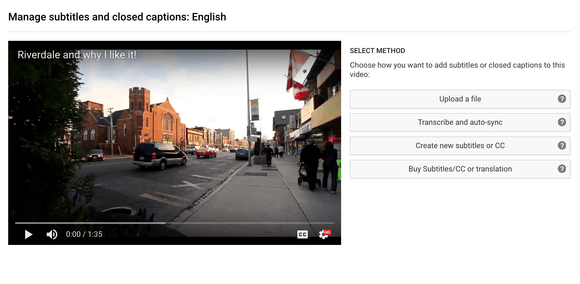
Once the video is uploaded, click on the CC button underneath it. This will take you to the caption editing interface. Youtube will ask you to choose the language spoken in the video, so choose the one you need.
As I mentioned before, Youtube is able to transcribe your video automatically, but it’s like the Google Translate of video transcribing services. If you want to use it, make sure you go through the transcript later and check for mistakes.
You will be given a few options to add subtitles – upload a file – transcribe and auto-sync – create new subtitles or CC – buy subtitles/CC or translation.
Choose Transcribe and Auto-Sync.
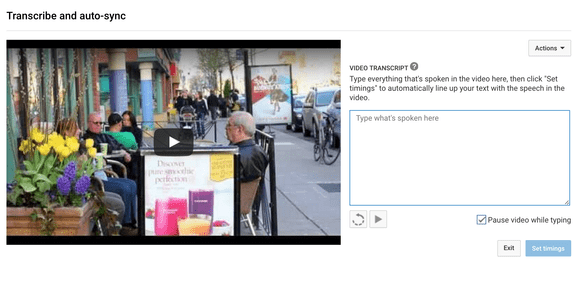
2. Transcribe and Auto-sync
Now this is where the magic happens.
The great thing about this transcribing service is that you have the option to stop the video while you’re typing. Which means there is no need to rewind and search for that one split second to continue transcribing. The video will stop whenever you start typing and start when you stop.
Don’t worry about the formatting, you can always fix it later. Just write it all as one big paragraph.
3. Set Timings
After you’ve finished transcribing your video, you need to set timings in order for your subtitles to work.
This is an example of a subtitle file:
1
00:00:00,979 –> 00:00:08,330
Riverdale is a wonderful location. That’s where I cut my teeth as a realtor.
2
00:00:08,330 –> 00:00:09,679
that’s where I began and where I first lived when I came
3
00:00:09,679 –> 00:00:14,440
to Toronto. And Riverdale has been through
4
00:00:14,440 –> 00:00:20,500
some amazing changes in the past thirty years.
It would be a huge waste of time to try and set the timings yourself manually. Fortunately, Youtube will automatically match the text with the speech in your video. After you’ve finished transcribing your video, click on Set Timings and wait for the text to sync. After a few minutes you will have a perfectly working set of subtitles to use either on Youtube or on any other video player, whether it’s on Facebook, Vimeo or in your own external video player software.
4. Download the subtitles
First make sure to double-check the subtitles. Although this tool is very close to being perfect, mistakes happen. After you’ve made sure the subtitles are correct, you should download them. To do so, click on Actions while still in the transcribing interface and choose the file type which you want to download. Facebook uses .srt and Vimeo .vtt.
Now let’s have a look at how you’re going to use those subtitles on Facebook.
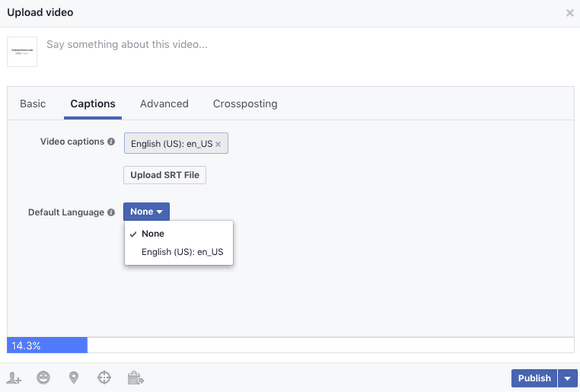
Uploading your subtitles to Facebook
Facebook requires .srt files and they have to have the same name as the video file. The naming convention for SubRip (.srt) files is:
filename.[language code]_[country code].srt
So if you have a video file named Art-Vandelay-interview.mov, your subtitle file should be named as following Art-Vandelay-interview.en_US.srt.
The full list of language abbreviations can be found here.
So there you go, this process should help you save time and avoid paid transcribing services, which would make sense if you want to create subtitles for a really long video or a movie. But for basic Facebook videos, this should be more enough.
Using Subtitles in FV player
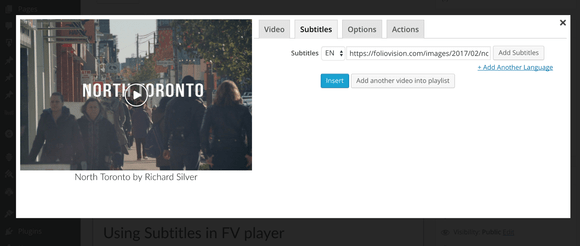
Our FV Player supports subtitles, even multilingual subtitles, which means you can upload multiple languages and the viewer can switch between the different versions.
If you follow the process I describe above, make sure you download the .vtt version to use in the FV player and simply upload it through the FV Player shortcode editor.
And there you go. You’ve successfully added subtitles to your video.

North Toronto by Richard Silver
If you have a better way to do this, please let us know in the comments. There is always room for improvement!
SK00SK


Leave a Reply