List of contents:
- How to Encode Multiple Audio Tracks
- How to Serve Multiple Audio Tracks
- How to Use Multiple Audio Tracks with FV Player
- Example
Adding multiple audio tracks to your videos opens up a world of possibilities. You can make your video available for as wide range of people as possible, or cater to the specific needs of your users. Subtitles are important, but sometimes they are not enough.
Whether you want to include various language speakers, add a curated commentary to your short film, or even provide your music students with various layers of a song, that’s where multiple audio tracks come into play.
How to Encode Multiple Audio Tracks
Note: For Amazon Web services, the encoding happens in Mediaconvert. If you’re using AWS, click here.
In order to stream a video with multiple audio tracks, you will need to encode it prior to hosting it anywhere. We recommend using the free and open-source tool FFmpeg.
The fact that FFmpeg works from a command line instead of having an interface of its own can be quite intimidating, but there’s no need to worry. It is truly powerful and best of its kind. With the right command, which we will provide you with in this guide, you can do just about anything. And for any other needs, FFmpeg is backed by a huge community of devote users eager to help.
Note: Unfortunately, more user friendly alternatives, such as HandBrake do not support this yet, but hopefully will in the future.
-
- Prepare both your video file and all your audio files into a single folder.
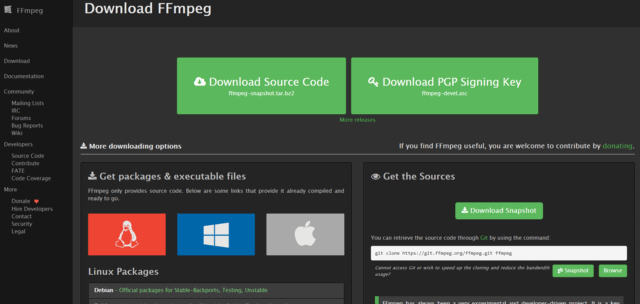
- Download FFmpeg here
-
- You might need to take further steps before being able to use FFmpeg successfully. All this depends on your operating system and download choice.
- Once you are sure FFmpeg is properly set up, open your command line and point it to the correct folder first, by inserting the cd (change directory) command. For example:
cd desktop\subfolder\subfolder2
- Once pointed to the correct folder, insert the encoding command according to this scheme
ffmpeg -i video.mp4 -i audio1.mp3 -i audio2.mp3 -i audio3.mp3 -map 0:v -map 1:a -map 2:a -map 3:a -metadata:s:a:0 language=eng -metadata:s:a:1 language=ger -metadata:s:a:2 language=spa -codec copy name-of-output-video.mp4
If you are adding audio tracks, that are not languages, or wish to name your language tracks differently, instead of language=eng, write title=”Your Title”
If you are inserting language instead of title, it is important to insert the correct language shortcuts to ensure, that the language gets recognized.
Note: Multiple audio track files can only be in mp3 or AAC format.
This is the encoding command used for adding multiple audio tracks to the example below. Adding English, German and Spanish language tracks in mp3 format to multiple-audio-tracks-raven.mp4 video and outputting a video called raven-multilangauge.mp4:
ffmpeg -i multiple-audio-tracks-raven.mp4 -i raven_en-edit.mp3 -i raven_de-edit.mp3 -i raven_es-edit.mp3 -map 0:v -map 1:a -map 2:a -map 3:a -metadata:s:a:0 language=eng -metadata:s:a:1 language=ger -metadata:s:a:2 language=spa -codec copy raven-multilanguage.mp4
How to Serve Multiple Audio Tracks
Not all hosting services support using multiple audio tracks. You will also want to encode the files into an HLS Stream to ensure that all browsers will be able to play the video properly.
Vimeo and YouTube do not support multiple audio tracks as of yet. YouTube is currently testing this feature and it could be available to the general public fairly soon.
FV Player Coconut
We recommend using Coconut, as it fully supports multiple audio tracks and you do not need to do anything special.
Encode your video with multiple audio tracks encoded (via FFmpeg) into an HLS Stream via the free FV Player Coconut as you always would and insert the link into the FV Player shortcode editor.
Amazon Web Services
Amazon Web Services supports multiple audio tracks too. With AWS, you do not need to use FFmpeg, as the multiple audio tracks encoding happens all in the Mediaconvert console.
- Upload the audio files to your S3 bucket.
- Prepare the video input and outputs as per this guide.
-
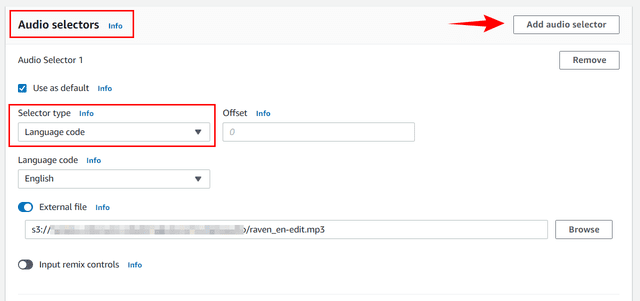
Go to Input and configure audio selectors.Choose selector type based on your needs and preferences (Language code, track, PID).
You can add as many of them as you need by clicking Add audio selector.
We recommend you add the audio files from your S3 bucket, as it is the easiest way. Browse S3 in the external file field.
-
Now go over to the output group. You will need new outputs for each audio track. Do not add the audio into existing video outputs.
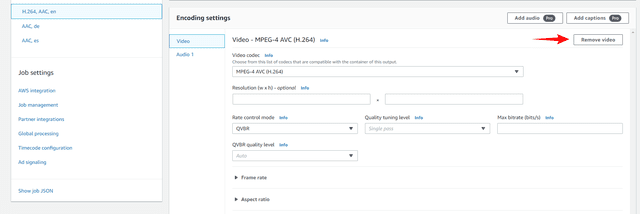
Remove audio from encoding settings of all the video quality outputs, and remove video from encoding settings of audio inputs.
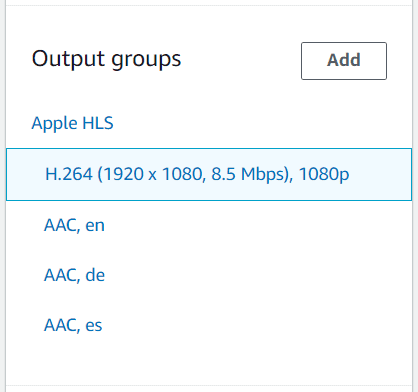
This is an output group with a single video and 3 audio outputs:
-
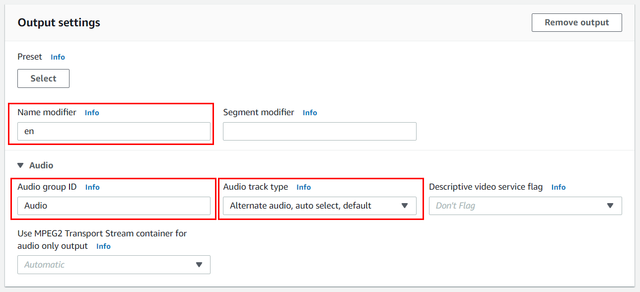
In each audio output, go to Output Settings -> Audio. Put in an arbitrary Audio group ID.
The Audio group ID must be the same in all audio outputs.
Then select the Audio track type – “Alternate audio, auto select, default” for the default audio and “Alternate audio,auto select, not default” for all the rest.
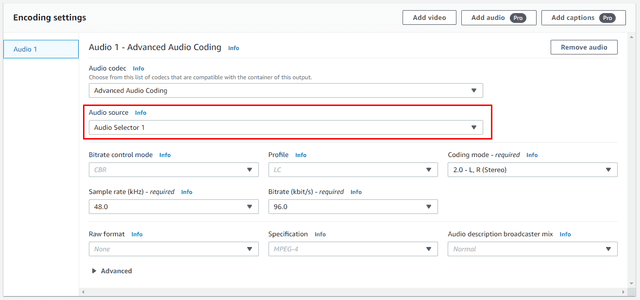
- Underneath, in Encoding Settings -> Audio Source Select the correct number of Audio Selector created in step 3. None of the other encoding settings are required for this purpose.
Adding audio rendition sets to video output settings Double check, if all selectors have correct audio source and the same Audio group ID.
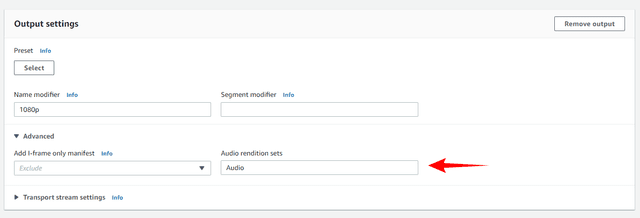
- Finally, go into all the video outputs. There, go to Output settings -> Advanced. Write the Audio group ID you set in step 5. to the Audio rendition sets. In this case, our audio group ID is simply called “Audio”:
AWS requires you to set an arbitrary Name modifier – this will be appended to the file name.
How to Use Multiple Audio Tracks With FV Player
Just insert the link to the shortcode editor as you would a normal video, and FV Player will recognize the multiple audio tracks automatically.
Once posted, the video will have an AUD button on the controlbar, allowing you to switch between the audio tracks.
EXAMPLE

